Debugging Using Radare2… and Windows!
26 February 2018
By Jacob Pimental
To start off I want to say I am a Linux person. I use it all the time for development. The command-line is amazing and very streamlined for computer-science related tasks. While I feel this way, there are those who do not and would prefer to use a Windows environment instead. So I want to show two things in this article, how to install and use radare2 for Windows, and also how to debug applications using radare2.
To get radare2 installed on Windows I went to their site and clicked on the “Download 2.3.0 for Windows” link that is at the top of the page. Then you simply run the installer and radare2 should be on your system! The problem was that all the installer did was drop the radare2.exe as well as the other tools in my C:/users/username/AppData directory. I would have to change directory into that folder from the command line in order to use the executables. In order to access the file from anywhere in the command line you will have to add the directory to your $PATH environment variable. This is just a variable your computer uses in order to find commands and applications you can run from anywhere on the system.
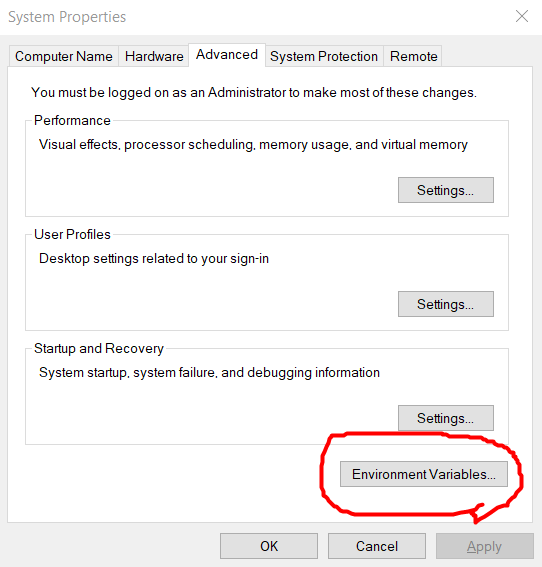
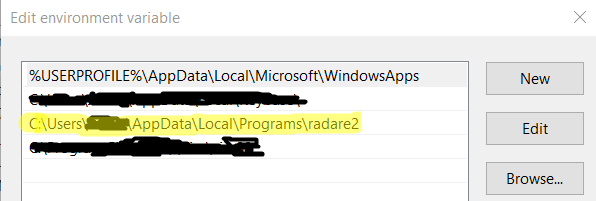
To change your $PATH variable you can do it one of two ways. You can use the Windows GUI to change it by going to System Properties -> Advanced -> Environment Variables, click on the Path variable and click Edit. Then you can add the directory leading to your radare2 files.
You can also be super 1337 and do it from the command line. The way to do this would be to open up PowerShell as administrator and use the command
[Environment]::SetEnvironmentVariable("Path", $env:Path + ";C:\Users\<username>\AppData\Local\Programs\radare2", [EnvironmentVariableTarget]::Machine)
This command makes it so that you do not have to add the folder to your $PATH variable every time you reboot your computer.
Now if you run the command radare2.exe you should see radare2’s help message. Meaning that you have successfully installed radare2 on your system.

Now that we have Radare2 installed we can move on to our tutorial on debugging. If you do not know what debugging is, it is essentially running the program and pausing at each assembly instruction. It allows you to see dynamically what is going on under the hood and is often times easier than static analysis. However when analyzing malware it is safer to perform static analysis since the file is not actually running. If you want to debug malware, since it is an important part of the analysis process, then you should do it in a Virtual Machine.
I will be demonstrating how to solve Challenge 2 for the Flare-On 4 Capture the Flag challenge. The Flare-On challenge is an annual Reverse Engineering competition hosted by FireEye. I highly recommend anyone interested in Reverse Engineering to at least try it out as you can learn a lot from it. You can download the binaries from last year’s challenge from their site.
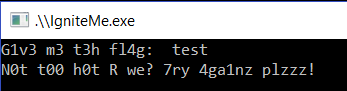
We should start by running the program to see what it expects from us and go from there. When we boot up the program we see it prompts us for a password. If we try to guess the password we are shown a message telling us that we are wrong. Not too complex, we just need to find out what the password is.
I’m going to run the binary through rabin2 to pull out basic information. I went over how to do this back in my first article detailing how to use radare2.
arch     x86
binsz    3072
bintype  pe
bits     32
canary   false
class    PE32
cmp.csum 0x00000e67
compiled Fri Jul 31 17:44:07 2043
crypto   false
endian   little
havecode true
hdr.csum 0x00000000
linenum  false
lsyms    false
machine  i386
maxopsz  16
minopsz  1
nx       false
os       windows
overlay  false
pcalign  0
pic      false
relocs   true
signed   false
static   false
stripped true
subsys   Windows CUI
va       true
There is nothing too interesting here, so we’ll take a look at the strings and see what we got.
\r?äΓÇ?αá?
GetStdHandle
ReadFile
WriteFile
ExitProcess
KERNEL32.dll
\r&IE*
xD+l]^E
+DonV\t_EGs&\n\r
G1v3 m3 t3h fl4g:
G00d j0b!
N0t t00 h0t R we? 7ry 4ga1nz plzzz!
Nothing overly interesting here either. We see the string “G00d j0b!” which is probably what we get when we guess the flag correctly. The rest of the information looks like a lot of jumbled garbage, so the password is probably encrypted. We’ll have to debug the application in order to find out how we compare our password to their encrypted one. Open up the application in radare2 using the -d flag which tells radare2 that we are going to be debugging this application.
> radare2.exe -d IgniteMe.exe
[0x77200cc0]>
From here we analyz the executable using the command ‘aaaa’. Then we jump into radare2’s special visual mode for debugging by using the command ‘V!’. This mode allows us to see the stack, registers, and other information all from one window.
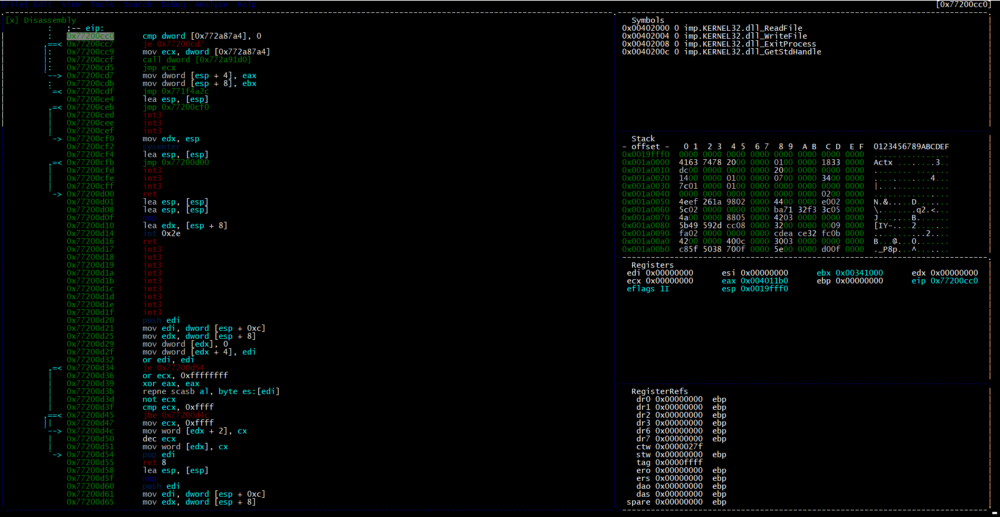
We can then use the command ‘s entry0’ to go to the main function of the binary. You can do this one of two ways. Either by quitting the visual mode using ‘qq’ and running the command in the normal view, or by running the command in the visual mode by using ‘:s entry0’. You can run any radare2 command in visual mode by prefacing it with ‘:’.
In entry0 we can see the program prompting us for a password.

After it outputs the string using WriteFile, it then calls another function. Radare2 had a hiccup when analyzing this function as it should be titled ReadFile, which is how the program grabs our input. It then takes our input and runs it through the function at 0x401050. We can set a breakpoint here by going back to our ‘V!’ mode, scrolling until that line is at the top of the page and hitting F2.

Then we can run the program using the F9 key. Radare2 will automatically stop us when a blank command prompt comes up, so we need to go back into radare2 and hit F9 again. We will then need to input our string and hit ENTER, we will then stop at the breakpoint we just created.


Now that we are at this function we can step into it using the F7 key. This will take us one instruction into the function and then stop.
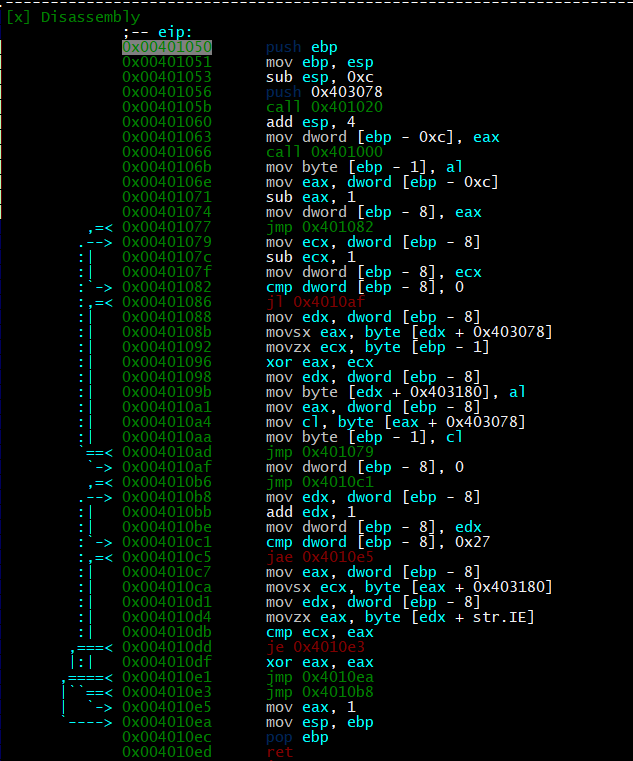
Looking at this it looks like it is encrypting our string and then comparing it to str.IE. We can step through this function step by step to see exactly HOW it is encrypting our given string.
First I used the F7 key to single step through the application until it reached
call 0x401020
I used the F8 to step over the function. I then took a look at the right side of the window to see what eax is, since functions normally return their data in eax.

Here we can see that eax is 2, which is the length of our string. So all that function did was check the length of our string. Let’s step a little more and see what that next function does.
I stepped over the function 0x401000 and it returned the hex value 0x00700004 and moved al into [ebp-1]. Essentially this just puts the number 4 into [ebp-1] we’ll see why we do this later.
We then see that we move the length of our string [ebp-0xc] into eax and start a loop that goes through each character in the string. As we step a little further through this we notice that the last letter of our string is placed into eax and the value in [ebp-1] is placed into ecx. We then xor the two values together to start the process of encrypting our string.

We then place the last letter in our submitted plaintext string into [ebp-1] and start the loop again.

So what it looks like we’re doing is xoring each letter of the string by the previous letter. If there is no previous letter than we xor that value by 4.
So for our string ‘hi’ we xor ‘i’ by 4 and xor ‘h’ by ‘i’. So our encrypted string becomes 0x1 0x6d. Looking later down the program we can see it compares this encrypted string to this string letter by letter.
\r&IE*\x17xD+l]^E\x12/\x17+DonV\t_EGs&\n\r\x13\x17HB\x01@M\f\x02i
Some of these values are hexadecimal values instead of strings. This is radare2’s way of parsing the data. Now that we know what is going on we don’t need to debug the application anymore and can move to decrypting that string to find out what the flag is. The nice thing about xor is that we can use it to both encode and decode. So the way to decode this string is to xor the last character by 4, take the next value and xor it by the previous decoded value.
i^4 = m
0x02^m = o
\f^o = c
M^c = .
@^. = n
0x01^n = o
B^o = -
H^- = e
0x17^e = r
0x13^r = a
\r^a = l
\n^l = f
&^f = @
s^@ = 3
G^3 = t
E^t = 1
_^1 = n
\t^n = g
V^g = 1
n^1 = _
o^_ = 0
D^0 = t
+^t = _
0x17^_ = H
/^H = g
0x12^g = u
E^u = 0
^^0 = n
]^n = 3
l^3 = _
+^_ = t
D^t = 0
x^0 = H
0x17^H = _
*^_ = u
E^u = 0
I^0 = y
&^y = _
\r^_ = R
So the flag is R_y0u_H0t_3n0ugH_t0_1gn1t3@flare-on.com. If we put that in we see that we pass the challenge.

This has been a very basic info using the Radare2 debugger on Windows. I personally prefer using x64dbg when I debug applications, but this was a fun learning experience. As always if I did something wrong or there is some way I can improve then please feel free to reach out and tell me. You can contact me at my LinkedIn or my Twitter.
Thanks for reading and happy reversing!